I made many more overhead maps to make sure it's clear what will be on the map. I put these in the first post.
Keep in mind it's a night map.
Here is a LENGTHY description.

AS-Energy
Premise
Most of the Black Legion, along with the Necris Phayders that comprise a large portion of it, were banished to the frozen moon of Coret in early 2216. However, they managed to hijack a small ITV class vessel and activate the interstellar zonegate in place there. The Black Legion then landed on the planet Zeus 6, which has many rich Tarydium deposits in its crust, and prepared to attack a weapons supply facility that resides there.
This facility is the private and only weapons supply facility for the flagship of the EDF (Earth Defense Force). It supplies Tarydium to power the ships ion cannons and propulsion systems and shock core (need another name for this I think) to power the ship’s shields and the small arms of the crew. The intent of the Black Legion for this episode is quite clear: they wanted to damage any part of the EDF that it could, because that would in turn damage the NEG (New Earth Government), but the attack on this facility turned out to be more effective than anticipated.
The flagship of the EDF just days after this attack encountered the flagship of the Skaarj fleet. Had the EDF’s flagship been fully powered it would have easily destroyed the Skaarj vessel and the Skaarj fleet would have scattered, but it was low on supply as a result of this attack. The flagship was destroyed and the Skaarj fleet grew confident because of this and the entire fleet attacked and surrounded Earth. The attack upon this facility is what caused the Seven-Day Siege of the Human-Skaarj Wars.
Facility Description
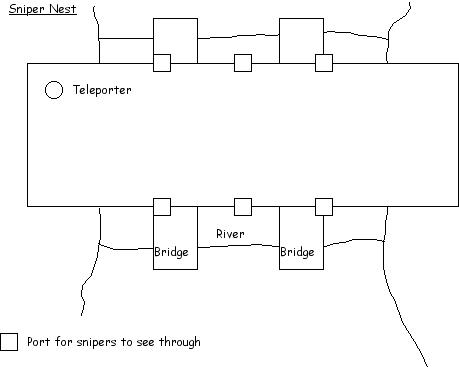
This facility is located in a dried up river-valley, hence the the defensive installations of the facility must cover all estuaries of that river-valley; the EDF would have much preferred a more defensible location, but this area was most rich in Tarydium.
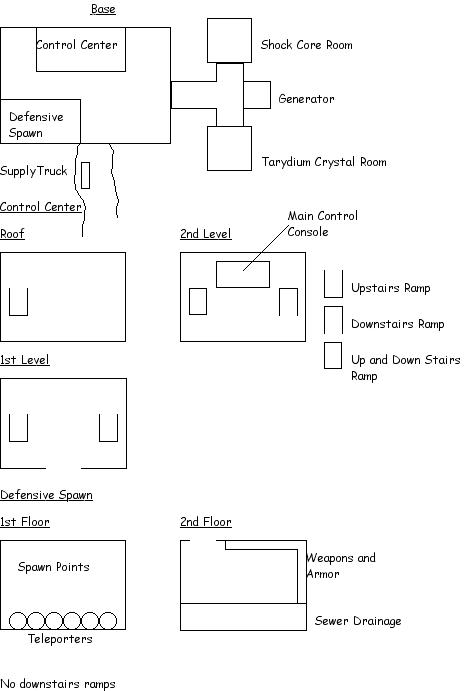
The map starts with the attackers in a cave. The attackers must make their way through the defensive installations and into the facility itself. Just outside the facility is a supply truck filled only with GES Bio Rifles and ASMD Shock Rifles. Before this attack, the facility was just getting ready to send a supply vessel to the EDF’s flagship.
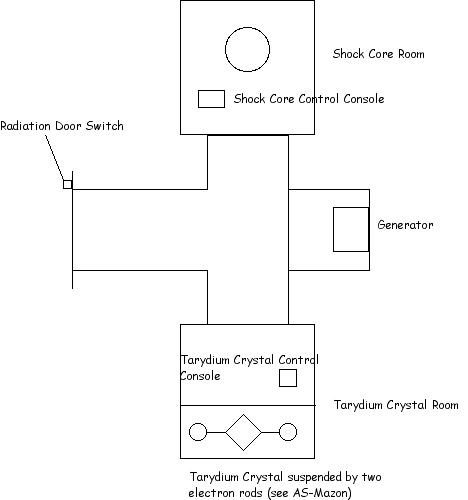
Inside the facility is the Defensive Spawn, the Control Center, and the Radiation Door, past which lies the Shock Core and Tarydium Crystal. Because of the amount of radiation that shock ions and tarydium can emit under certain conditions a special lead-coated door had to be put in place to protect the crew of the facility in case an accident occured. Also, to open the door, the Radiation Door Switch must be pressed and then the Confirm Radiation Door Switch of the Main Control Console in the Control Center must be pressed. The Main Gate can also be opened using the Main Gate Switch on the Control Console.
Inside the Energy Weapons Supply Area is the Shock Core and Tarydium Crystal themselves. Tarydium can be extremely volatile under certain conditions and behind protective glass. For diagnostic purposed, the glass can be lowered by pressing a simply switch. Because the Shock Core is more or less stable, it is not housed behind glass. Also, the Power Generator of the entire facility is housed behind Security Doors.
FortStandards
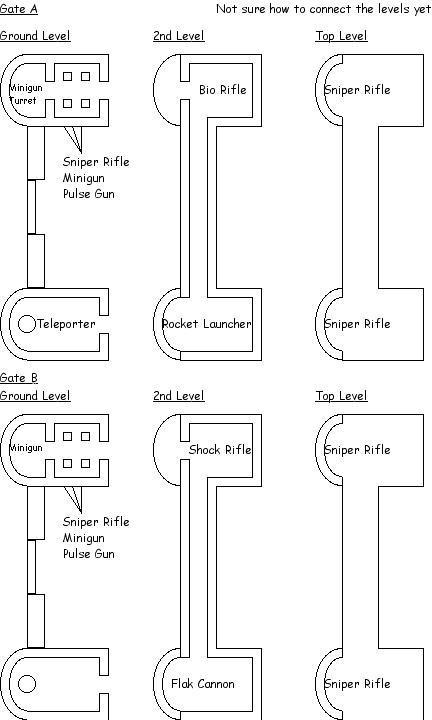
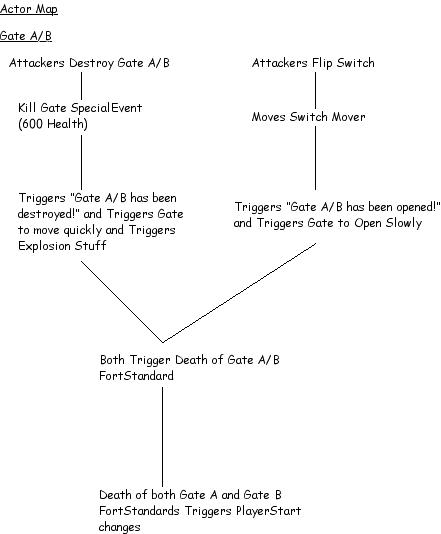
1. Gate A has been opened/destroyed!
The Gate A Trigger will be at the front gate. If the Trigger is destroyed (600 Health) it will display a “Gate A has been destroyed!” message and kill the FortStandard. However, the gate can also be opened by launching to the other side of the gate and pressing the switch. In this case, a “Gate A has been opened!” message will be displayed. Opening the gate will also kill the FortStandard.
If the Trigger is destroyed then the gate switch be deactivated, and vice versa.
2. Gate B has been opened/destroyed!
The Gate B Trigger will be at the front gate. If the Trigger is destroyed (600 Health) it will display a “Gate B has been destroyed!” message and kill the FortStandard. However, the gate can also be opened by launching to the other side of the gate and pressing the switch. In this case, a “Gate B has been opened!” message will be displayed. Opening the gate will also kill the FortStandard.
If the Trigger is destroyed then the gate switch be deactivated, and vice versa.
Once both FortStandards have been killed, new spawns will activate at each gate for the attackers.
3. Charge has been placed!
The front gate to the facility is closed. A charge will be placed and be delayed 10 seconds before blowing up and destroying the gate.
Consistent with the plot of the map, there will be a supply truck just outside the gate with only GES BioRifles and ASMD Shock Rifles. The attackers will have to make due with these.
4. The Radiation Door Switch has been flipped!
There is a switch right next to the Radiation Door that must be flipped to open the door. This FortStandard, however, will not open the gate. This FortStandard must be pressed first.
5. The Radiation Door Confirm Control Switch has been pressed!
To actually open the Radiation Door, the Main Control Console must be manipulated to confirm the Radiation Door opening.
6. Tarydium Crystal Safety Glass has been lowered!
To the attackers right is a room containing a Tarydium Crystal. Press the Control Console to lower the glass.
7. The Tarydium Crystal has been destroyed!
The Tarydium Crystal must now be destroyed. (500 Health) The instant after the crystal is destroyed, security doors of the room close because the crystal will likely explode.
8. The Shock Core has been deactivated!
In the middle of a room opposite the Tarydium Crystal Room is a room with a huge, active Shock Core. Press the console to deactivate the Core.
Objectives 7 and 8 can be done in any order.
9. The Generator has been destroyed!
The number of electons used to suspend the Tarydium Crystal is directly proportoinal to the mass of the Tarydium Crystal. Thus, when the Crystal is destroyed, there is a massive number of free electrons wandering the power grid of the facility. The computer will try to compensate for this by adding to the charge of the Shock Core. However, when the Core is deactivated, there is no where for the free electrons to go. To avoid a short circuit, the computer is forced to shut itself and the rest of the power grid down, opening the security doors to the generator as a last act before powering down, thinking that the crew of the facility will now repair whatever is wrong with the power generator. This is the attackers’ opportunity to destroy the power generator and complete the mission.
See the Actor Map to visualize better how the Triggers and FortStandards will work together.


") ) make the defense far too easy? I was really hoping to have something like this in the map, but if it won't work out I'll take it out. Keep in mind this area can be bypassed by launching, there will be a secret entrance ot the base somehwere around here
) make the defense far too easy? I was really hoping to have something like this in the map, but if it won't work out I'll take it out. Keep in mind this area can be bypassed by launching, there will be a secret entrance ot the base somehwere around here 


")

 )
)